

How To Set Up Travis Ci

Automate tests with Travis CI
You've got 99 bug, and testing is one of 'em!
Developers know that testing an awarding thoroughly is necessary to grab bug before they affect users. Forgetting to test tin issue in complications like annoyed clients, ranting ane-star reviews in the App Shop, and bruises from smacking yourself in the head for letting simple mistakes slip through the internet.
Only remembering to run tests before each commit or merge can exist tough if you have to do it manually. What's a fourth dimension-crunched developer to practise?
Continuous Integration
Thankfully, Continuous Integration can relieve the mean solar day. Continuous Integration, often abbreviated to just CI, is the process of automatically edifice and running tests whenever a change is committed.
Now, Apple has their ain solution for this with Xcode Bots, which are designed to run on Bone 10 Server. But the downside of Apple tree's solution is that you, yes you have to manage the entire process. Y'all take to ready and maintain Os X Server and Xcode versions on the server, figure out access control for viewing results, and handle provisioning and signing issues. Sounds like a lot of work, correct? Y'all don't have time for this; you lot have code to write, apps to blueprint, and happy hour to get to – that beer isn't going to drink itself.
Shout information technology to the cosmos with me: at that place must be an easier way!
Travis CI
Luckily, the cosmos heard us, and responded with Travis CI.
What is Travis CI?
Usually but called Travis, information technology's a Continuous Integration service that is complimentary for open-source projects and has a monthly fee for airtight-source projects based on how many simultaneous builds you lot desire to run.
What does it practise?
Travis sets upwards "hooks" with GitHub to automatically run tests at specified times. By default, these are gear up to run afterwards a pull request is created or when code is pushed upwards to GitHub.
In this Travis CI tutorial, you'll utilise a public GitHub repo and the gratis version of Travis to set up upwards tests that run every time you effort to merge new changes into that repo.
Notation: this tutorial assumes that:
- You already have a GitHub business relationship. If you don't, sign up for a free one hither.
- Git is installed on your arrangement. Yous can check this by opening up Last and typing which git. If there's a result – typically /usr/bin/git – and so you're good to get. If non, you tin download an installer from the Git website hither.
Getting Started
Let's do this! Download the starter projection, and then open up the naught file and put the resulting MovingHelper folder on your Desktop so you tin can notice information technology hands. MovingHelper is a to-do listing app which, as you lot might suspect from the name, helps manage tasks related to moving.
Build and run your project in Xcode; you lot'll see the following:

Utilise the picker to cull a engagement a little less than a month from the electric current engagement, and then tap the Create Tasks push. Y'all'll see the post-obit:

The app has created a list of tasks. The ruby-red sections are past-due tasks, while the light-green sections are upcoming tasks.
Looking through the code, you'll see that a few tests have been set up. Execute the tests by using the Control-U shortcut, and they volition apace run and pass:

And so far so proficient, right? Now that you know the tests are passing, you lot're ready to go GitHub and Travis prepare up to run them automatically.
Setting Upwardly Git and GitHub
Outset, yous'll create a local Git repo with the files in the starter project. Fire up Terminal, then alter the directory to your desktop folder:
cd ~/Desktop/MovingHelper Adjacent, initialize a local repository on your calculator:
git init Adjacent, add together everything in the MovingHelper folder – since you're already in it, just type:
git add --all Finally, commit all the code:
git commit -chiliad "Starter projection from raywenderlich.com" Now that everything is committed locally, information technology's time to create a public repository on GitHub. This is what Travis will watch for changes.
Note: Go out this Last window open every bit you'll demand information technology again later, and it'll salvage you lot having to navigate back into the appropriate binder.
Head over to github.com and make certain you're logged in to your account. In the acme correct corner of the page, there's a plus sign with a little downwards arrow next to it – click it and select New repository:

Yous will see a page to set the new repository:
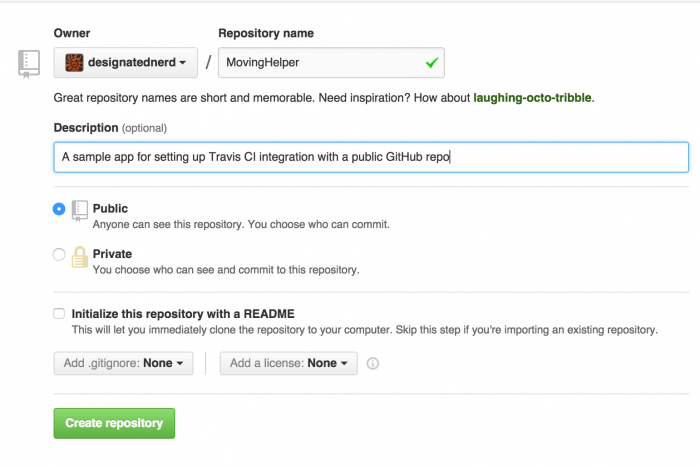
The owner will be you lot. Name the repo MovingHelper, give it a brief clarification, make certain it'south public, and don't add a README, license, or .gitignore as these are all included in the sample project. Next, click the big green Create repository button. Y'all'll see a folio explaining how to get your code to GitHub.

Leave this page open up in a tab of your browser – you'll want to come dorsum to it shortly.
Set Upward Travis
Open a new tab in your browser and get to travis-ci.org to get started using the free version of Travis. In the upper correct corner is a button which allows you to sign in using your GitHub account:

Use this button to sign up for Travis. Since you're already signed in to GitHub, y'all should not need to sign in again. If you haven't already signed up for Travis, you'll need to concur to the permissions they request:
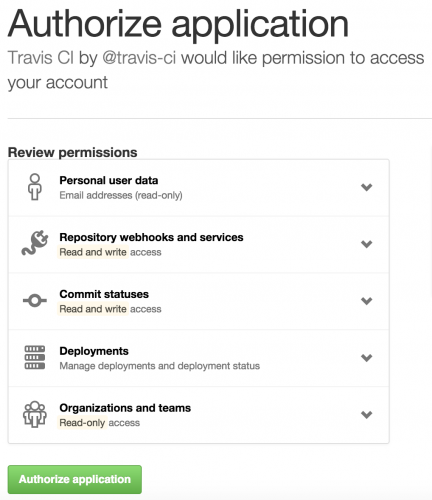
Travis needs admission to read and write webhooks, services, and commit statuses. That style that it tin can create the automated "hooks" information technology needs to automatically run when you want it to.
Click the green Authorize Application button. GitHub will ask you to verify your password:

Enter your countersign and click Confirm password. Now y'all're on the Travis "getting-started" page.
Your avatar and GitHub username are in the upper right hand corner:
![]()
Click that to exist taken to your Travis contour page. You lot'll see an alphabetical listing of all your public repos. If you haven't set up Travis previously, they should all be unchecked.
Whorl downward to MovingHelper:

Film the switch to turn it on:

There! Travis is now watching for changes to your MovingHelper repository.
Pushing to GitHub
Go dorsum to the tab with your newly created GitHub repo. Copy the commands from the "…or push an existing repository from the command line" section:

Note: Use what's on your repo, not what's shown in the screenshot, since yous will need to push to the remote that's tied to your GitHub username, not mine. :]
Copy the text from that department either manually or by clicking the clipboard icon on the right, and so paste it into Terminal and press enter. This adds your new GitHub repo as a remote and pushes everything up to it.
Since Travis is now watching this repo, information technology will notice this push and put a build in the line of all the other open source builds waiting to be run.
Note: Builds on the open up-source version of Travis may accept a while to run – y'all're basically in line with anyone else running open-source tests. And different at the Post Office, you can't skip in line by pretending you're belatedly for your child's dance recital. ;]
Whenever your tests run, yous'll go an email that contains something like this:

Ruh roh! What happened? Click on the large Build #1 Failed to be taken to the results of the failed build:

That warning at the bottom contains 1 specific line that explains why the build failed:
Could not detect .travis.yml, using standard configuration. What does that mean? Well, .travis.yml file uses YAML to tell Travis how to set up a build. Since Travis works with many different languages, it doesn't know how to build your specific project without some data well-nigh what kind of project it is.
To get a quick wait at some of Travis' best features requiring very petty configuration, check out a new branch from the command line by typing the following into Terminal:
git checkout -b travis-setup Terminal volition confirm that you created and checked out a new branch:
Switched to a new branch 'travis-setup' Next, open your patently-text editor of choice. TextWrangler is particularly helpful hither because it highlights the syntax of YAML files automatically, merely whatsoever plain-text editor will work.
Create a new certificate and save information technology in the root of your repo as .travis.yml.
Note: You may get a warning virtually names prefixed with a . beingness reserved for the organization, but use the dot anyway – Travis will be looking for a file named exactly .travis.yml, so the dot is safe to use hither.
Add the following five lines to your new .travis.yml file:
language: objective-c #ane osx_image: xcode6.4 #ii xcode_project: MovingHelper.xcodeproj #3 xcode_scheme: MovingHelper #iv xcode_sdk: iphonesimulator8.4 #5 Note that YAML volition condone anything prefixed with a # as a comment. Here's what you're telling Travis to do with each line:
- Build a projection using … Objective-C!? Don't panic! Even though your project is in Swift, Travis only uses the
objective-cvalue to know to build with Xcode command line tools. Since Xcode knows how to tell what's in Swift and what's in Objective-C, your Swift project volition exist only fine. :] - Use the Xcode six.4 tools to create the build, since you're using Swift 1.two. This presently requires specifying which VM paradigm you want to use – in this example
xcode6.4. - Use the specified Xcode project file. Annotation that if yous take a project you want to build using an .xcworkspace (for example, a project using CocoaPods), you can replace the xcode_project parameter with
xcode_workspaceand apply your .xcworkspace file as the value instead of your .xcodeproj. - Use the specified scheme to determine what tests to run. Since your default scheme is called MovingHelper, Travis should utilise that scheme.
- Run the tests on an iPhone simulator, because doing so does not crave setting upwards code signing (which is not covered in this tutorial).
Make sure your .travis.yml file is saved, then add and commit it to Git:
git add .travis.yml git commit -m "Added .travis.yml file" Next, push your co-operative up to your remote:
git push -u origin travis-setup Reload the webpage for your MovingHelper GitHub repo. Yous should meet something like this, indicating that the branch has fabricated it upwards to GitHub:

Click the green Compare & pull request push.
Note: If you don't see Recently Pushed Branches, click the greenish button next to the branch name. Leave the base branch as principal, but modify the compare branch to travis-setup, and then click Create pull request.
Alter the title of the pull request to Travis Setup:

Click the green Create pull request button, and Travis will automatically commencement working. As soon as your build completes, you'll see something similar this on your GitHub folio:

Argh! You've added the .travis.yml file like y'all were supposed to, so why isn't it working?
Click 1 of the Details links to see the results of this build. A new error leads you directly to the problem:

D'oh! Travis knows the name of the scheme, just because it was automatically created and isn't shared in your GitHub repository, Travis can't see it. Fix that by going back to Xcode, and from the scheme drop-downwardly, selecting Edit Scheme…

When the scheme editor comes up, check the Shared checkbox at the lesser of the panel:

Click the Close push, and then add together and commit all shared information (which volition include the new shared scheme):
git add MovingHelper.xcodeproj/xcshareddata git commit -m "Added shared scheme" Push up to GitHub over again:
git push button -u origin travis-setup Since y'all already have an open up pull asking, Travis will immediately know that you added changes and start building again:

Once the build completes, you lot should see what you've been waiting for: green!

All is well indeed. Click on Show all checks and the dialog will aggrandize, showing you the builds which passed:

Click on either Details link, and yous'll exist taken to Travis' output. You lot can scroll through and meet the details of how your project was built and how your tests ran, but the bottom line – and the skilful news – is all the style at the end:

Each item with a green checkmark next to it is a passing test – and as you lot can see with the happy green text at the terminate, all of the tests are passing! Woohoo!
Go back to your GitHub page and click the green Merge pull request button, then click Confirm merge to officially merge your changes.
Hello, Earth!
At present that your tests are running automatically, it's time to tell other people that your tests are passing past adding a bluecoat to your README which shows the current status of the build on Travis.
Before you get besides far, make sure you're up to date with everything in your chief branch:
git checkout primary git pull origin master Switch back to your travis-setup branch and merge the changes from primary into it:
git checkout travis-setup git merge principal Now that the merge commit has been merged back into your travis-setup branch, open up the README.dr. file from the root folder of your project in your markdown or plain-text editor of choice.
Add together the post-obit lines to the cease of the file:
####Master branch build status:  Don't forget to replace [your-username] with your actual GitHub username.
You've just added a link to a graphic which will be a "passing" or "declining" badge served up by Travis based on the status of your build for the branch specified in the branch URL query parameter.
Salvage the changes to the README, then add, commit, and push button them upward:
git add . git commit -m "Add Travis bluecoat to README" git push origin travis-setup Go back to the GitHub page. Follow the same steps as before to create a new pull asking. Name this new pull request Badges, and click Create pull request.
Travis will once over again do its business organisation – and since you didn't change any of the code, the tests volition go along to pass:

Once more, click the Merge pull request and then Confirm merge buttons to merge your changes. Once merged, you'll come across your badge correct on your chief MovingHelper GitHub folio:
![]()
Breaking the Build
Now that you've gotten a couple of passing pull requests without irresolute any code, it's time to have things to the next level: breaking the build. :]
First by bringing your master branch up to date with the latest changes you just merged in:
git checkout master git pull origin main To see the problem you want to fix, build and run the application, and cheque off one of the boxes. Build and run again. The box is no longer checked. Oops!
When yous go a report of a issues from a tester or a user, it'south a good idea to write a test that illustrates the bug and shows when it is fixed. That way, when the tests are run you can be confident that the issues hasn't magically reappeared – unremarkably known as a regression.
Let'due south make certain that when you mark a job washed in the list, the app remembers. Create a new co-operative for this work and proper noun it to-done:
git checkout -b to-done Open up Xcode and go to the TaskTableViewCell.swift file. You can run across in tappedCheckbox() that in that location's a TODO comment instead of the actual code to mark a chore as done. For the cell to communicate the job country alter, it will need a reference to the task and a delegate to communicate the change to. Add variables for these two items below the outlets:
var currentTask: Job? public var consul: TaskUpdatedDelegate? Since cells are reused, clear the values of these variables before the cell is reused by overriding prepareForReuse() and resetting each value to nada:
public override func prepareForReuse() { super.prepareForReuse() currentTask = nil delegate = nil } Add together a line to the top of configureForTask(_:) to store the current chore:
currentTask = task Replace the TODO in tappedCheckbox() with code to mark the task as done and notify the consul of the change:
if permit chore = currentTask { job.done = checkbox.isChecked delegate?.taskUpdated(task) } Finally, become to MasterViewController.swift, and in tableView(_:cellForRowAtIndexPath:), add a line but above where the prison cell is returned, setting the MasterViewController as the delegate of the prison cell:
cell.delegate = self Build and run. Cheque off an item, and then stop the app. Build and run once again. Hooray, the item is still checked off!
Commit your changes:
git add together . git commit -thou "Actually saving done state" Automation
Now that you have stock-still the issues, it'southward fourth dimension to write a test which Travis tin run automatically. That way if things change, yous'll know immediately.
First, select the MovingHelperTests group in the Xcode sidebar, and so choose File\New\File… and select the iOS\Source\Swift File template. Name this new file TaskCellTests.swift, and make certain information technology's being added to the test target, not the primary target:

Next, fix the bones test case class by replacing the existing import statement with the post-obit:
import UIKit import XCTest import MovingHelper grade TaskCellTests: XCTestCase { } Add a test which verifies that when the checkbox in a TaskTableViewCell is tapped, the associated task is updated:
func testCheckingCheckboxMarksTaskDone() { let cell = TaskTableViewCell() //ane let expectation = expectationWithDescription("Chore updated") //two struct TestDelegate: TaskUpdatedDelegate { let testExpectation: XCTestExpectation allow expectedDone: Bool init(updatedExpectation: XCTestExpectation, expectedDoneStateAfterToggle: Bool) { testExpectation = updatedExpectation expectedDone = expectedDoneStateAfterToggle } func taskUpdated(task: Job) { XCTAssertEqual(expectedDone, task.washed, "Task done state did not friction match expected!") testExpectation.fulfill() } } //3 let testTask = Job(aTitle: "TestTask", aDueDate: .OneMonthAfter) XCTAssertFalse(testTask.done, "Newly created task is already washed!") cell.delegate = TestDelegate(updatedExpectation: expectation, expectedDoneStateAfterToggle: true) prison cell.configureForTask(testTask) //4 XCTAssertFalse(cell.checkbox.isChecked, "Checkbox checked for non-washed job!") //5 jail cell.checkbox.sendActionsForControlEvents(.TouchUpInside) //vi XCTAssertTrue(cell.checkbox.isChecked, "Checkbox not checked later tap!") waitForExpectationsWithTimeout(1, handler: nothing) } This is what each part does:
- Create an expectation for which to expect. Since the delegate is a separate object from the examination, you may non hitting the success block immediately.
- Create an inline struct, conforming to the test delegate, which allows yous to check and run across whether it was chosen or non. Since you desire this struct to tell you when the expectation has been met, and practice a bank check based on a value you laissez passer it, you make it accept both the expectation and the expected values every bit parameters.
- Fix the examination task and verify its initial value, so configure the jail cell.
- Make sure the checkbox has the proper starting value.
- Imitation a tap on the checkbox past sending the
TouchUpInsideevent which would exist chosen when a user tapped on it. - Brand sure everything gets updated – starting with the checkbox by verifying its state has updated, and and then wait for the expectation to be fulfilled to make sure the delegate is updated with the new value.
Build the test, but don't run information technology – it'south time to be lazy, kick back, and let Travis do it for y'all. Commit your changes and button them upwardly to the remote:
git add . git commit -m "Test marking tasks done" git push -u origin to-done Create a new pull request following the steps you used previously, and call it To-Washed. As you probably guessed from the instruction not to run your tests, this build fails:

Click the Details link to become the details of the build failure. Curl all the mode to the bottom, where yous'll see the following:
![]()
Scroll up a bit to see information nearly a crash which occurred while running the tests:

D'oh! The force-unwrap of an IBOutlet didn't work, so the test crashed. Why would that be?
If y'all recall about how the TaskTableViewCell is normally created – through the cell reuse queue managed by a view controller loaded from a storyboard – this crash makes sense. The prison cell isn't beingness loaded from the storyboard, so the IBOutlets don't become hooked upwardly.
Fortunately, this isn't too hard to prepare – catch a reference to a cell from an instance of MasterViewController instantiated from the storyboard, and employ its tableView(_:cellForRowAtIndexPath:) method to grab a valid jail cell.
Add the following lines at the tiptop of testCheckingCheckboxMarksTaskDone(), wrapping the code yous already added in the if argument:
var testCell: TaskTableViewCell? let mainStoryboard = UIStoryboard(proper noun: "Main", bundle: nil) if allow navVC = mainStoryboard.instantiateInitialViewController() as? UINavigationController, listVC = navVC.topViewController as? MasterViewController { let tasks = TaskLoader.loadStockTasks() listVC.createdMovingTasks(tasks) testCell = listVC.tableView(listVC.tableView, cellForRowAtIndexPath: NSIndexPath(forRow: 0, inSection: 0)) as? TaskTableViewCell //REST OF Code YOU ALREADY ADDED GOES Here } Side by side, to make sure the exam doesn't pass if listVC is somehow nil, add an else clause to the if let which fails the examination if it gets hit:
} else { XCTFail("Could not get reference to list VC!") } Now update your existing test code to apply the cell you've simply generated. Supplant:
let jail cell = TaskTableViewCell() with:
if let cell = testCell { //REST OF THE CODE BELOW SETTING Upwards THE CELL GOES HERE } else { XCTFail("Examination cell was nil!") } Once over again, exist lazy and let glorious automation do your piece of work for y'all. Build the test to make sure the lawmaking compiles, but don't run it. Commit your changes and push them upward to the remote:
git add together . git commit -thou "Update grabbing jail cell for test" git push button -u origin to-done Again, yous have an existing pull request, so when Travis runs the tests, you should see good news in your GitHub repo:

Click the Merge pull asking button, then the Ostend merge push, and y'all're washed.
Congratulations! Thanks to the effort you've put in as you lot've worked through this Travis CI tutorial, y'all now have a base of operations of tests y'all can employ to make certain you don't suspension anything equally you improve the application, and Travis is gear up to run them automatically. No more than running tests manually – and there'south still time for happy hour :]
Where To Get From Here
Yous tin can download the finished projection here.
This tutorial has only scratched the surface of what Travis CI can do. No, information technology won't fetch you coffee, or beer, simply Travis is useful for considerably more than than just running tests.
Further Capabilities of Travis
- Using mail-build hooks, it can upload the results of your build to an AWS S3 bucket automatically with minimal configuration.
- You can gear up up pre-build scripts to install and mail-build remove certificates from the keychain to create signed builds.
- If y'all're creating signed builds, y'all tin can also add mail-build scripts to automatically upload builds to HockeyApp or iTunes Connect whenever tests pass later on a merge.
Travis isn't always sunshine and lollipops, however.
A few caveats to continue in listen:
- New versions of Xcode are not typically fabricated bachelor until they've been publicly released. This means yous tin can't employ Travis to build a version of your app that's using a beta SDK.
- Since they have a paid service, Travis has an incentive to upgrade everything in a timely fashion. Sometimes, however, that incentive doesn't cause them to upgrade fast enough for anybody's tastes. If you always need to exist on the bleeding edge, keep this in heed.
- Build machines can exist a bit slower than your local machine. Specially if y'all're running UI tests with KIF, you may run in to instances where the slowness of the build automobile means yous meet race weather you wouldn't encounter on existent devices, or test flakiness on the build server you don't meet locally.
- You get a lot of information in the logs from Travis, but you can't get crash logs without setting upwards scripts to upload them to a 3rd-party service after a build complete.
- All tests are run on simulators. If y'all accept tests which must be run on a device, Xcode Bots is a amend choice since it can run on both simulators and real devices – although this comes with the responsibility to manage provisioning and signing.
Want to know more than?
If you're interested in learning more about continuous integration with Travis, cheque out the following documentation:
- General Build Configuration Guidelines, which give a proficient overview of the Travis build process.
- Travis Objective-C documentation, which likewise covers Swift projects.
- Travis Os X CI Surroundings documentation, which helps determine what is or is not included in the default environment on Bone X, as well equally stock environment variables you can admission in your .travis.yml file.
I've hope you lot've enjoyed this Travis CI. If yous've got and questions then please feel costless to ask them in the comments below!

How To Set Up Travis Ci,
Source: https://www.raywenderlich.com/1618-travis-ci-tutorial-getting-started
Posted by: sizemoreseenitioneve.blogspot.com
0 Response to "How To Set Up Travis Ci"
Post a Comment